-- 发布时间:4/7/2007 8:56:00 PM
-- [原创]Google Web ToolKit入门(一)
最近在学习Google Web ToolKit,把自己的一些心得写一下吧。不足之处多多指教。我将叙述三个例子,第一个例子GWT工程的创建,第二个例子利用GWT从服务器端获取一个字符串,第三个例子利用GWT从服务器端获取一个XML文档
Google Web Toolkit (GWT) 是一个Java软件开发框架用于开发类似于Google Maps和Gmail的AJAX应用程序. 你可以用Java编程语言开发你的界面,然后用GWT编译器将Java类转换成适合浏览器执行的JavaScript与HTML。Eclipse开发插件Googlipse。
安装Google Web Toolkit(也可以参见GWT的自带文档)
1. 安装Java SDK.
到sun网站下载一个最新的JSDK,配置环境变量PATH和CLASSPATH。
2. 下载Goolge Web ToolKit,现在最新的版本是1.3.3这篇文章也将使用1.3.3版本的Goolge Web ToolKit。解压gwt-windows-1.3.3.zip文件。为了以后方便使用可以把解压后的文件夹路径加入到环境变量PATH里面。
3. 下载安装eclipse,最好安装上MyEclipse。
第一个例子-Hello World!
下面我们使用GWT来做一个Hello World的程序,也可以参看IBM网站上的入门介绍网址:http://www.ibm.com/developerworks/cn/java/j-lo-gwt-intro/index.html.也可以看http://code.google.com/webtoolkit/gettingstarted.html里面Hello World程序的创建。
GWT创建的方式有两种,一种是有eclipse工程文件配置的,一种是没有的。创建时候的区别就是加不加-eclipse 参数。两种方式的区别就是,能不能作为工程导入到eclipse中。下面是不带-eclipse 参数的GWT工程创建:
D:\gwt1.3.3>applicationCreator com.mycompany.client.MyApplication -out ./MyApplication
Created directory .\MyApplication\src
Created directory .\MyApplication\src\com\mycompany
Created directory .\MyApplication\src\com\mycompany\client
Created directory .\MyApplication\src\com\mycompany\public
Created file .\MyApplication\src\com\mycompany\MyApplication.gwt.xml
Created file .\MyApplication\src\com\mycompany\public\MyApplication.html
Created file .\MyApplication\src\com\mycompany\client\MyApplication.java
Created file .\MyApplication\MyApplication-shell.cmd
Created file .\MyApplication\MyApplication-compile.cmd
D:\gwt1.3.3>
带参数的GWT工程创建:
D:\gwt1.3.3>projectCreator -eclipse MyProject -out ./MyProject
Created directory .\MyProject\src
Created directory .\MyProject\test
Created file .\MyProject\.project
Created file .\MyProject\.classpath
D:\gwt1.3.3>applicationCreator -eclipse MyProject com.mycompany.client.MyApplication -out ./MyProject
Created directory .\MyProject\src\com\mycompany
Created directory .\MyProject\src\com\mycompany\client
Created directory .\MyProject\src\com\mycompany\public
Created file .\MyProject\src\com\mycompany\MyApplication.gwt.xml
Created file .\MyProject\src\com\mycompany\public\MyApplication.html
Created file .\MyProject\src\com\mycompany\client\MyApplication.java
Created file .\MyProject\MyApplication.launch
Created file .\MyProject\MyApplication-shell.cmd
Created file .\MyProject\MyApplication-compile.cmd
D:\gwt1.3.3>
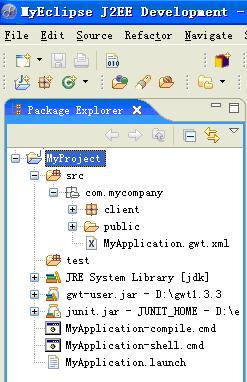
创建好以后,打开eclipse通过,文件->Import…,选中General 选项中的”Existing Projects Into Workspace”然后”Next”,在下一个选项页,选择路径” D:\gwt1.3.3\MyProject”,单击”Finish”。就可将GWT工程导入到eclipse中了。如下图所示:
选中工程,单击”Run”,就可以运行了,如下:
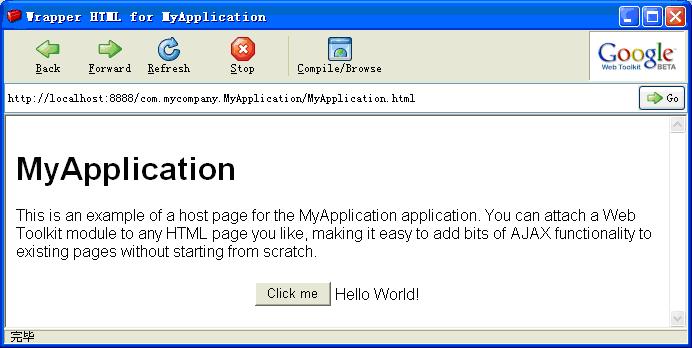
页面上只有一个按钮,单击以后,会在一个Label中显示Hello World!。工程到此就创建完毕。
打开刚才创建工程的MyApplication.java文件:
package com.mycompany.client;
import com.google.gwt.core.client.EntryPoint;
import com.google.gwt.user.client.ui.Button;
import com.google.gwt.user.client.ui.ClickListener;
import com.google.gwt.user.client.ui.Label;
import com.google.gwt.user.client.ui.RootPanel;
import com.google.gwt.user.client.ui.Widget;
/**
* Entry point classes define <code>onModuleLoad()</code>.
*/
public class MyApplication implements EntryPoint {
/**
* This is the entry point method.
*/
public void onModuleLoad() {
final Button button = new Button("Click me");
final Label label = new Label();
button.addClickListener(new ClickListener() {
public void onClick(Widget sender) {
if (label.getText().equals(""))
label.setText("Hello World!");
else
label.setText("");
}
});
// Assume that the host HTML has elements defined whose
// IDs are "slot1", "slot2". In a real app, you probably would not want
// to hard-code IDs. Instead, you could, for example, search for all
// elements with a particular CSS class and replace them with widgets.
//
RootPanel.get("slot1").add(button);
RootPanel.get("slot2").add(label);
}
}
上面的代码就写了一个MyApplication类,它实现了EntryPoint接口,并实现了其中的方法onModuleLoad。(待续)